PicoCalc Lisp Machine


#1

There’s now full information about setting up and using the PicoCalc handheld computer from Clockwork Pi as a self-contained Lisp Machine based on the latest release of uLisp:

It incorporates an RP2040-based Raspberry Pi Pico board (supplied), but you can swap this for a RP2350-based Raspberry Pi Pico 2 board, their Wi-Fi versions, or any other compatible board.

It has a 320x320 4" colour IPS display that gives a scrolling display of 32 lines of 53 characters, a backlit QWERTY keyboard, and an SD card socket. It’s powered by one or optionally two 18650 rechargeable lithium batteries (not supplied), and these can be charged via the PicoCalc USB-C port.

For full details see: PicoCalc Lisp Machine.


#2

The latest release 4.7c incorporates the following improvements:

Copying the last line

Press the Tab key to echo the previous line typed after the uLisp prompt, allowing you to edit it.

Connecting to a computer

If you prefer to use the Serial Monitor by connecting the Raspberry Pi Pico micro USB port to the computer, compile and upload uLisp after commenting out this line as shown:

// #define Serial Serial1

Sound

You can now play notes through the internal speakers using the uLisp note function. For example, the following function plays a scale of C (the pin number is ignored):

(defun scale () 
  (mapc 
   (lambda (n) (note 0 n 4) (delay 500))
   '(0 2 4 5 7 9 11 12))
  (note))

The beep character beeps the speaker:

(write-byte 7)

Reading a pixel

The function read-pixel reads a pixel from the screen at coordinates (x,y):

(read-pixel x y)

It returns the 5-6-5 colour value.

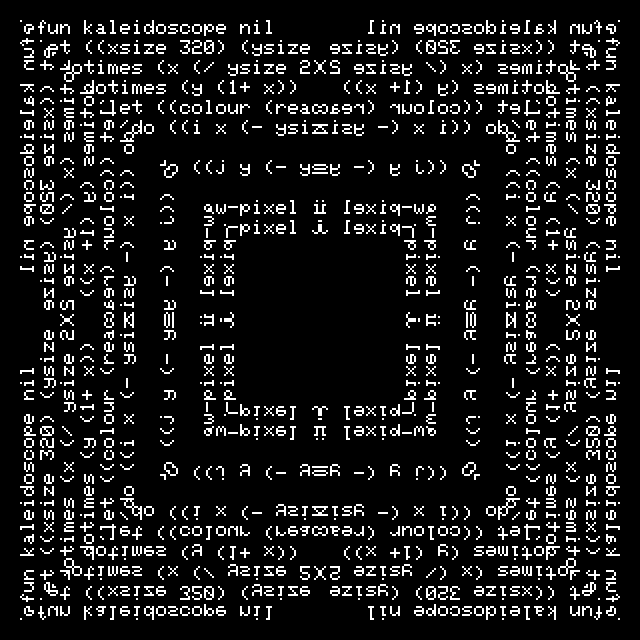
For example, the following kaleidoscope function takes a triangular section of the image on the screen, and reflects it through horizontal, vertical, and diagonal lines to create a symmetrical image, like a kaleidoscope:

(defun kaleidoscope ()
  (let ((xsize 320)
        (ysize 320))
    (dotimes (x (/ ysize 2))
      (dotimes (y (1+ x))
        (let ((colour (read-pixel x y)))
          (do ((i x (- ysize x 1)) (m 0 (1+ m))) 
              ((>= m 2))
            (do ((j y (- ysize y 1)) (n 0 (1+ n))) 
                ((>= n 2))
              (draw-pixel i j colour)
              (draw-pixel j i colour))))))))

Here’s the result of running it on a listing of itself, and then saving the screen as a BMP file using save-bmp:

Saving an image of the screen

The function save-bmp saves a copy of the screen as a BMP format image file to the SD card with the specified filename:

(save-bmp filename)

#3

The PicoCalc now has the autocomplete feature recently added to the Cardputer; for details see:

PicoCalc uLisp Machine - Autocomplete


#4

This is great! My screen is supposedly out for delivery today, so back at it soon.

Any interest in a Pico 2W images? I’ve been asked about it on the Clockwork forums, and I’m happy to build and test it. My PicoCalc has the 2W in it, so I have to do this anyways.


#5

Yes, perhaps I should put UF2 images for the other compatible boards in a folder on the repository. If you’d like to contribute the Pico 2W one that would be great.

Another board I plan to try is the Pimoroni Pico Plus 2 which has 8MB of PSRAM. I believe it should be pin compatible with the PicoCalc socket.


#6

My screen showed up, and the PicoCalc is back in service. Is there a naming preference for the image? Right now, I have ulisp-picocalc-pico2w.uf2, but happy to change it.


#7

I have ulisp-picocalc-pico2w.uf2, but happy to change it.

Sounds perfect - thanks!


#8

PR submitted, and I should have a Pimoroni Pico Plus 2 arriving this weekend.


#9

About the serial port:

  1. connect the USB cable and open up your serial application on your PC before power on the PicoCalc.
  2. the baud rate is 9600
  3. hot plug doesn’t work here.

I was confused for days on the serial port, because the Lisp Badge always reset when the serial cable inserted, thus it works immediately, and my other experience about the serial port is it always support hot plug.


#10

I’ve just tried it on my Mac with Serial Monitor in the Arduino IDE, and using the PicoCalc USB-C port. This worked:

  • Turn on PicoCalc.
  • Plug in USB cable.
  • Open Serial Monitor.

Perhaps what’s confusing is that you don’t get the “uLisp 4.7d” prompt on the terminal, but if you just type something in it works fine.

What sequence doesn’t work for you?


#11

Hi David

You’re right, I don’t see the prompt on the serial, and I tried to type something (jsut enter enter…) and see nothing feedback, thus I guess the serial doesn’t work. I was wrong. By the way, I’m using minicom/tio command line under the Ubuntu 22.04/24.04 to access the serial port.

If I plug in the USB cable, and power the PicoCalc, I can see:

uLisp
Error: undefined: ulisp
22280>

If I power the PicoCalc then plug in the USB cable, I can see nothing on the screen even I press enter, but if I type 1 and enter, prompt comes out.


#12

I’ll see if I can make that work more tidily, but it’s difficult because the serial port takes a bit of time to wake up.


#13

Any notion how many changes would be needed to handle a PicoCalc with a Pimoroni Pico Plus 2[W] instead of a Pico|Pico2[W]?


#14

BTW, the PicoCalc itself works fine with the Pimo Pico Plus 2W, if that’s of any help. I’ve used it with a couple different images now, after someone else (or I) modified them to work with Pico Plus 2W – point is, the PicoCalc hw drivers, etc. seem fine with the PicoPlus2 hw.


#15

I think you’ll just need to add an entry for the Pimoroni Pico Plus 2W in the uLisp source file, starting with:

#elif defined(ARDUINO_PIMORONI_PICO_PLUS_2W)

and based on a combination of the existing ones for the RASPBERRY_PI_PICO_2W and the PIMORONI_PICO_PLUS_2. I think it’s just a case of adding:

#include <WiFi.h>

Also, in the rest of the code search for where there’s defined(ARDUINO_PIMORONI_PICO_PLUS_2) and add defined(ARDUINO_PIMORONI_PICO_PLUS_2W) to the list.


#16

Ah, okay, great, thanks! I hadn’t realized the PicoPlus2 was already supported, sorry.


#17

Hi picolisper

The serial monitor enabled in your pico2w image? I just flashed it into my new pico2w board, there is no response on the ttyACM0 serial. thanks.


#18

Mine is currently disassembled (soldering in an RTC) so I can’t check just yet; I just cloned the repo, though, and changed the board. It should be the exact same otherwise.


#19

I tested your image again, the serial port on the Type-C port works fine.

By the way, can you please help to release an image with resetautorun enabled? thanks.